What you are drawing with in Glyph Drawing Club are actually font files, and the shapes are individual glyphs from font files. It might be a lesser known or used feature of Glyph Drawing Club, but you can draw with ANY font with Glyph Drawing Club. All you need is an OTF or TTF font file, and then you can drag and drop that font straight into the editor window and that font will be loaded & ready to be used.
The problem with non-GDC font files is that they are not designed to fit into a square cell, because fonts usually have varying amounts of space around them, so it's difficult to line them up perfectly.
On the other hand, if you are a type designer and particularly interested in the modular method of creating type, it might be worthwhile to use Glyph Drawing Club for prototyping, generating interesting shapes, experimenting and just having fun with your own modular pieces.
This tutorial is for making your own modular typefaces for Glyph Drawing Club and it's quite simple really (the technical aspect at least!).
What we want to make is basically a font where each glyph has a square bounding box. We need to do this, so when you draw with your modular font in GDC, there are no unwanted spaces around the shapes and that features like rotation and flipping works correctly. Because we are basing our font in a square, you can easily rotate a square 90 degrees without any weird issues. The square is there only for technical reasons, but you can absolutely make any type of modular system your heart desires!
Setup
This tutorial assumes you have Glyphs. Let's get set up.
- In Glyphs create a new font (File -> New)
- Open Font Info (File -> Font Info... or
CMD + I). - In the Font tab fill in Family Name, Designer, Designer Url etc.
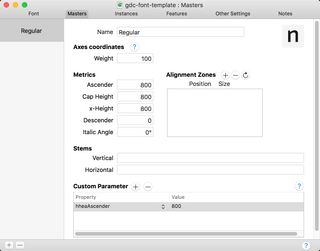
- In the Masters tab under Metrics set the values of Ascender, Cap Height and x-Height all to 800, Descender to 0 and Italic angle to 0°.
- Still in the Masters tab, click the plus icon next to Custom Parameters, then from the "New Parameter" find hheaAscender and set the value to
800.
Add glyphs
Glyphs App works with unicodes, but since we are making a modular typeface we don't really want to put our modular building blocks into the wrong Unicode. The code point for "A" for example shouldn't have anything else than a shape representing an "A" in it, so we'll be using Unicode's Private Use Area in the E000-F8FF range. In Unicode, a Private Use Area is a range of code points that will not be assigned characters by the Unicode Consortium, so this is the perfect place to put our own modular shapes that don't have a counterpart in the Unicode.
- Hit
CMD+Ato select all the letters, numbers & symbols that are loaded in by default, and click the small minus sign on the bottom left side to remove them. - Copy any amount of code points from this list.
- From the top menu click Glyph -> Add Glyphs..., paste in the codes and click Generate.
- You should see a list of glyphs generated in the overview. Select all of them with
CMD+Aand in the bottom left you should see a value 600 under the <-H-> icon. Make that value 800 and hitEnter. Now all bounding boxes for the glyphs should be a perfect square, ready to be used in Glyph Drawing Club.
(Optional) Making a grid
One thing you might want to do with your own modular typeface is to base it on a grid system so it's easier for you to make shapes that connect to each other. The typefaces (like Tesserae) in Glyph Drawing Club uses a simple 4x4 grid, so if you want to make a Tesserae compatible modular font, you should too. But of course, you can base your modular typeface on any grid system (or no grid at all).
- Open one of the glyphs by double clicking it in the overview.
- Right click anywhere on the page and select "Add Guide". Click on the guide (easier if you click the small circle), and set X to 1000, Y to 0. Then create 4 more guides, and for each guide set the Y value every 200 interval, so you have guides at Y 0, Y 200, Y400, Y600 and Y 800.
- Add 5 more guides, but this time set the angle at 90°, Y at 1000 and X every 200 interval.
- Shift + click all the guides to select them all, right click and select Lock Guides. Right click again and select Make Global Guide.
Drawing shapes
Now you are all set up for making your own modular building blocks! The only thing left to do really is to draw those shapes. This is really up to you, but here's a few helpful tips:
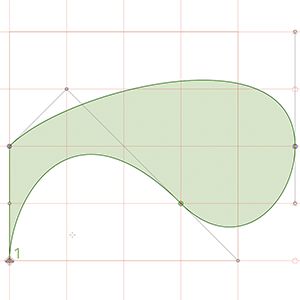
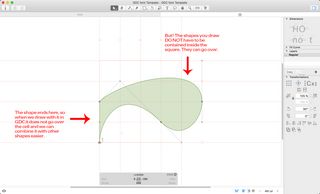
- The square shape we have is the size of one cell in Glyph Drawing Club. To make shapes connect to each other nicely, make sure at least part of your shape goes all the way to one side of the square but not over (so some vector points would be at x0, x800, y0 or y800).
- Depending on what you are making and contradicting the previous point, the shapes you draw can go over the square grid! Note that if you go over the square inverting the shapes in GDC don't work as expected anymore. It just inverts the square but not the shape that goes over the square.
- Make sure that your shapes have correct path direction. For simple shapes you can just click Paths -> Correct Path Direction.
Export & Use in GDC
Once you've made all the shapes, the only thing left is to export your font and test it.
- Click File -> Export and choose OTF. Do not check Autohint or Remove Overlap.
- Open the folder where you exported your font, then drag & drop the font file (.OTF) to anywhere in Glyph Drawing Club window. Your new font should now be loaded and ready to use!
- Note: Switching to different fonts is a bit of a hassle at the moment. If load in your custom font, but then you want to use Tesserae for example, you need to choose some other font from the dropdown first, and then choose Tesserae. I'll work on a fix for this in the future!
- If your font doesn't work or there's weird spacing issues, make sure the hheaAscender custom parameter is set to 800 in the font info!
Rearranging glyphs in Glyphs App
Glyphs App doesn't provide any easy way to reorganise your glyphs. I guess it's not on their priority list, as the use case is such a niche. I mean who would want to have B before A in their font. But for modular fonts it's a different matter because the shapes we draw don't have any standardised order to them, so we might want to reorganise them ourselves.
The way to change the order of glyphs in Glyphs App is to open Font Info, and adding a custom parameter "glyphOrder" in the Font tab, and then simply pasting a list of unicodes your font has. It's a pain to do manually, so I made a little tool to help: Easy glyphOrder sorting for Glyphs App.
- Upload your font file (OTF, TTF)
- Click on the shapes, and use `arrow keys` to reorder them. `Esc` to deselect.
- Once you are done, copy the list of unicodes.
- Open your glyph font file in Glyphs app, open Font info (`CMD+I`), navigate to Font tab.
- Add new custom parameter, set property to "glyphOrder" and paste the unicode list as values.